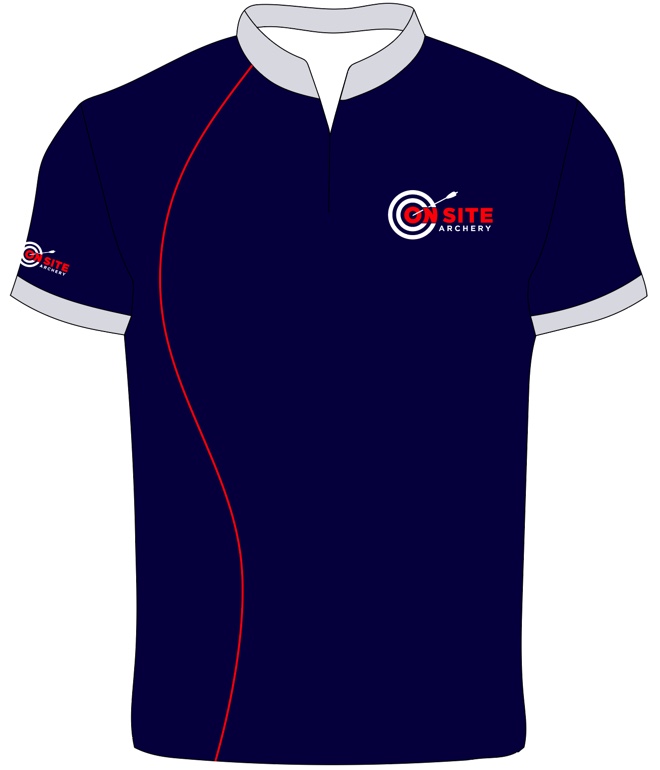
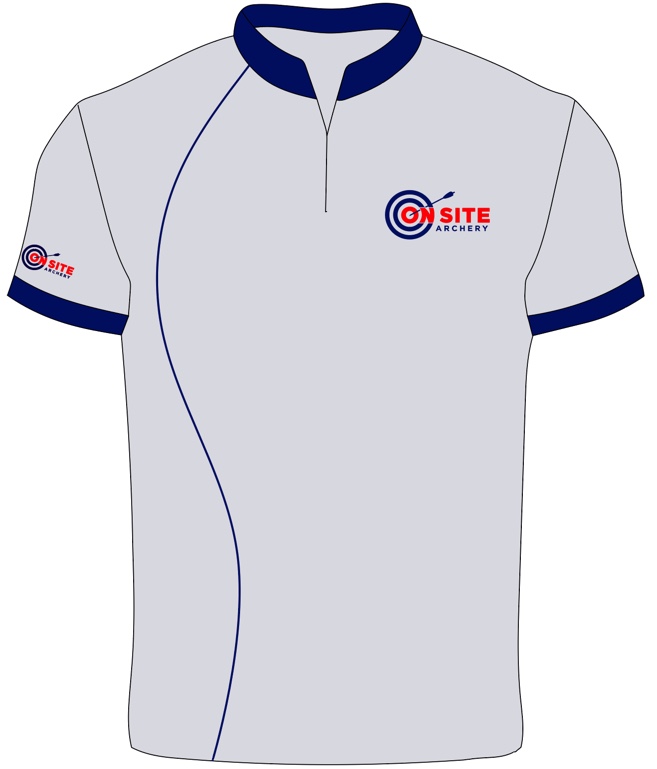
I recently submitted an order to Atomic Archer Jerseys for two On Site Archery jerseys. Atomic Archer Jerseys make great archery shirts, in my opinion, and are very comfortable to shoot in. Both shirts are identical in regards to the layout but differ in regards to color. One shirt is for shooting indoors and one for outdoors. The indoor shirt is dark blue because I’m not concerned with heat when shooting indoors, and the outdoor shirt is light gray so one can stay cooler while the shirt reflects the sun relatively well. T-Shirts don’t work well outdoors in the heat because when you get sweaty they tend to stick to your skin, and this becomes a problem because dealing with being uncomfortable starts taking focus away from the precision of shooting.
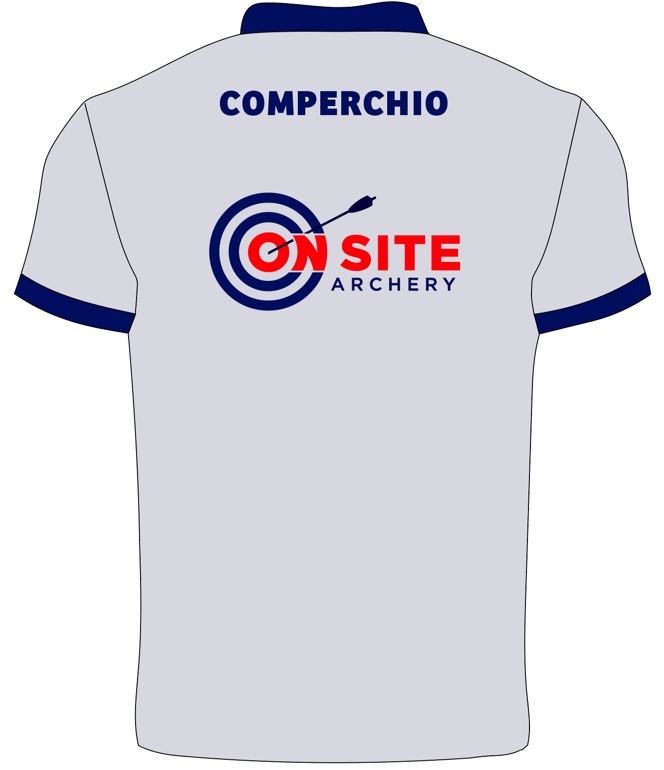
Here they are with the name of an archery brother of mine, Mike Comperchio (he is the creator of the logo, so I wanted to give him props):


Though I’m a software engineer and am familiar with some details of how images, vector graphics, and other such things work, I’ve never worked with the Adobe Illustrator software often used for designing shirts…so this was not a slam dunk for me. I had to learn a few things, which along with designing a shirt took a while to fully get off the ground.
The big lift was the creation of the logo, which Mike artfully handled and gave to me as an eps file. Logos can be sent to companies such as Atomic Archer Jerseys in a number of different formats, but vector graphic file formats such as eps or ai (Adobe Illustrator) files work best. This is because the graphics in these files are defined by mathematical formulas instead of pixels, hence their flexibility scales great–unlike plain image files that do not scale well at all.
With the eps file in hand and with Adobe Illustrator on my iPad and MacBook Pro (I paid for a temporary, monthly subscription to Adobe), I could take the logo and bring it into Adobe Illustrator to change its size or its colors in order to look good with whatever design I came up with for the shirt.
Because Atomic Archer Jerseys does not share their shirt template, the next problem was getting their shirt outline into Adobe Illustrator–to allow me to draw a design on their shirt with at least some precision. I copied the shirt outline from Atomic Archer Jerseys’ site, just as a simple image, and then traced over it on my iPad using my Apple Pen and the pencil tool in Adobe Illustrator. This resulted in an outline of their shirt that was just about perfect. With this in hand, I could draw whatever I desired on top of the shirt in Illustrator.
I visited Atomic Archer Jersey’s brand apparel page to get some ideas for shirts. I liked a number of these and spent some time trying to utilize pieces of the designs into a shirt for On Site Archery, but nothing worked out all that great. So, I let the project sit for a bit while it simmered in my head. I also asked a few people what they thought of in regards to the brand apparel shirts I liked and they mostly all said the same thing: they like a clean and classic looking design, unlike some of the “noisy” shirts that one may see in the archery world.
Once I had the indoor shirt designed (yeah, I know, using a logo given to me, drawing a line on the shirt, and picking out a few colors seems simple, but believe me, starting from scratch and deciding what you like is not) I simply flipped some of the colors around to create a lighter version of it for an outdoor shirt. Now it was time to reach out to Atomic Archer Jerseys for some guidance on getting a shirt made!
To create a custom shirt with Atomic, you either fully use their custom shirt builder, in which you use one of their “template” shirts, pick from a good but limited selection of colors, and pick from their existing logos, or you use some of their template stuff but not all, or you create it fully custom. I did the latter, but regardless of which approach you still follow the same process: Use the custom shirt builder to design it and then place an order. Once the order is received, you will be sent an email asking you for the files that show your shirt design and the logo files. If you fully go the “template” route with none of your own design elements such as your own logo, you won’t have to send any files to Atomic.
Note: Any kind of custom design, whether it be a partial custom design based off of the Atomic Archer Jersey templates, or a full custom design, is subject to a $120 design fee (at the time of writing), which can run higher as the design increases in complexity.
- Create the design you want by downloading the files attached to this post, “BlankShirtFront.ai” and “BlankShirtBack.ai”. These are Adobe Illustrator files are are mimics of the Atomic Archer Pro Style Collar shirt. Because they mimic the shape of the real shirt, they will help you jump into designing instead of trying to define the shirt shape. Note: I could not upload these files due to file permission issues, and I will not pay a monthly WordPress fee to give me the option to upload them. Sorry! That said, I’d be happy to send you the files if you are interested…just leave a comment.
- With Adobe Illustrator, create the logo(s) you want and save them as “.eps” file(s), or find a guy like Mike to create them for you…an approach I highly favor (hehehe). Use them in your design (in the “.ai” file in step 1) however you wish.
- Go to their shirt type page to select which kind of shirt you want (crew cut, pro style, polo, etc.). After selecting the type you will be taken to the custom shirt builder tool.
- Pick the shirt design you want. If you don’t want any of the supplied shirt designs, then it doesn’t matter what you pick.
- On the custom shirt builder tool you will be asked for three colors. Either pick the colors you want, or if like me you are creating a shirt that isn’t based upon a template offered and is a custom color, pick the same one for all. If none of these colors match what you want, don’t worry–you’ll be able to define your own colors in a later step I will mention.
- Scroll past the “Add Logos from Logo Library” section unless you want to use an Atomic Archer Jerseys supplied logo.
- In the “Add Custom Logo” section you will add a logo for each location you want a logo on the shirt. For example, in the dark blue shirt above, I added three custom logos: one for the front left logo, one for the right sleeve logo, and one for the back logo. I gave them a name that described this, such as “OnSiteArchery_IndoorLogo” and then created three entries, each with a different position.
- In the “Additional Information” section add in as many details as you want to get your idea across, along with details they may want to know. You don’t have to go too crazy here as after you add the shirt to your cart and pay for it, you will then be sent an email asking for logos and any files that will help with the design. With the logo(s) as an “.eps” file, and the overall design as an “.ai” file, the design team at Atomic will have everything they need to get things done. That said, I noted in the “Additional Information” section the CMYK color(s) that would be applicable. For my shirt, it meant giving the CMYK values for the blue color and the gray color.
- Fill out any front name or back name information you’d like.
- Select the size and quantity of each shirt you want.
- Add the shirt(s) to your cart and do the normal checkout process.
- You will get an email confirming the order and then another email asking for the eps file(s) and ai file(s). The confirmation email mentions having the proof sent to you in 2 to 4 business days.
Reordering
Once you’ve got a shirt designed, ordered, and you’ve gone through the proofing process by email, it’s easy to reorder:
- Go to the Atomic Archer Jerseys’ shirt selection page and pick the style you want. You can pick any shirt style you want, not just the original shirt style.
- Once you select the shirt style, you’re taken to the custom build tool where you have to pick a shirt template, but it doesn’t matter which one you pick. You won’t fill out any of the information in the builder page other than placing the original order number in the Additional Information box. If you are an On Site Archery member, you will use Order # 100003483_Stephen Seymour for the blue shirt and Order # 100003484_Stephen Seymour for the light gray shirt.
- Select the name (if you want a name), size, quantity, and add to the cart. Repeat as many times as you wish for as many shirts as you’d like, and place the order.
- After you place the order, you will receive an email for your approval of the shirt. This may take up to a day (maybe more, but for me it has never taken more than a day). Once you approve the shirt will be considered ”in production” and it’s usually about a 6 week wait for delivery. It typically gets busier in the Winter around the Lancaster Archery Classic and Indoor Nationals, so the delivery time can increase by two or three weeks. You will want to get your order in and approved by Thursday morning by 8 AM CT or you will lose a week.
- If you know of other people that want the same shirt, and you can get ten or more shirts ordered, you’ll get a break on cost according to this pricing page.